How can I view and manage subscriptions in Shopify
In this article we will go over the key features of subscription management and show you things you might not know on how you can have an overlook of your subscriptions, customers who subscribed and how you could work with them and manage them in many different ways. First, we will go over why subscription management is important for any store and what are its benefits for using it correctly. Then we will show you all the things you can do with Seal Subscriptions app when it comes to managing your subscriptions and subscribers.
The first step is to install Seal Subscriptions in the Shopify app store: Install Seal Subscriptions here
Why subscription management is important
By effectively managing your subscriptions, you can lead your company into better revenue management, allowing you more accurate financial planning and growth. You should know which products that your customers subscribe to are the most popular and which products gain you more revenue because of subscriptions. It's also important to know why your customers cancel certain subscriptions with a well setup cancellation flow. This way you can prevent more customers from canceling subscriptions in the future and reduce the churn. Always remember that customer satisfaction is key for sustained subscription growth.
First steps
Before we get to the explanation of what you can do with your subscriptions and how you can view and manage them it is good that you get a general understanding of subscription rules. Subscription rules are exactly what it sounds like. It's a rule for you to create that will define which products can users subscribe to, define intervals that the users can select, and more.
Let's create our first subscription rule. By going to Seal Subscriptions → Subscription rules, you can create a rule by clicking on the create rule button. Here you have an option to pick one of the two subscription rule types:
- Auto-charging subscription rule: This is the most popular option for subscriptions. This rule will automatically charge your customers, however, keep in mind that your shop needs to use one of the supported payment methods for auto-charging subscription rules to work. The payment methods are Shopify Payments, Shop Pay, Apple Pay, Google Pay, Stripe, PayPal Express or Authorize.net. Not having any of these payment methods enabled in your shop won't allow you to have auto-charging subscriptions set, since this is a Shopify limitation.
- Recurring invoices: The classic subscription rule, that will not auto-charge your customers. This rule can also use other payment methods.
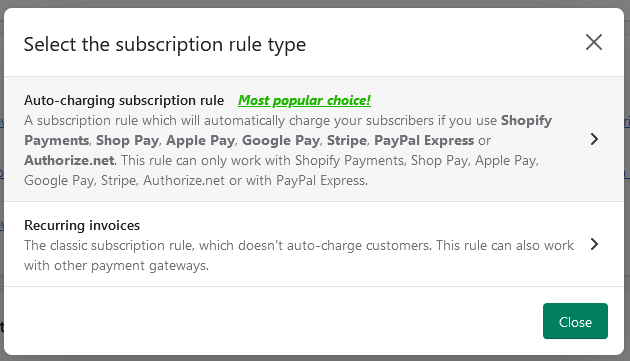
Since the auto-charging subscription rule is the most popular option, we will talk about it here.
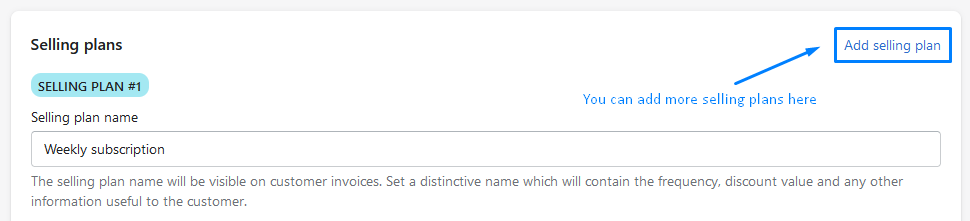
First, give your rule basic information such as the name and label for the plan selector. Next, pick all of the products that you wish this rule will apply to.
On to the main section of creating a subscription rule which is creating the selling plans. Each selling plan has a delivery interval and options to add discounts and requirements to it. The selling plan can also be pre-paid. This means that the customer will pay in advance for more than just one subscription. In this case, setting up billing intervals is also needed.
You can watch our great tutorial video about subscription rules and creating subscription rules here
Now that you've created an actual subscription rule, let's move to subscription management.
List of your subscriptions
Once you installed the Seal Subscriptions app, the first step is to click on the Subscriptions tab in the navigation menu by going to Seal Subscriptions → Subscriptions.
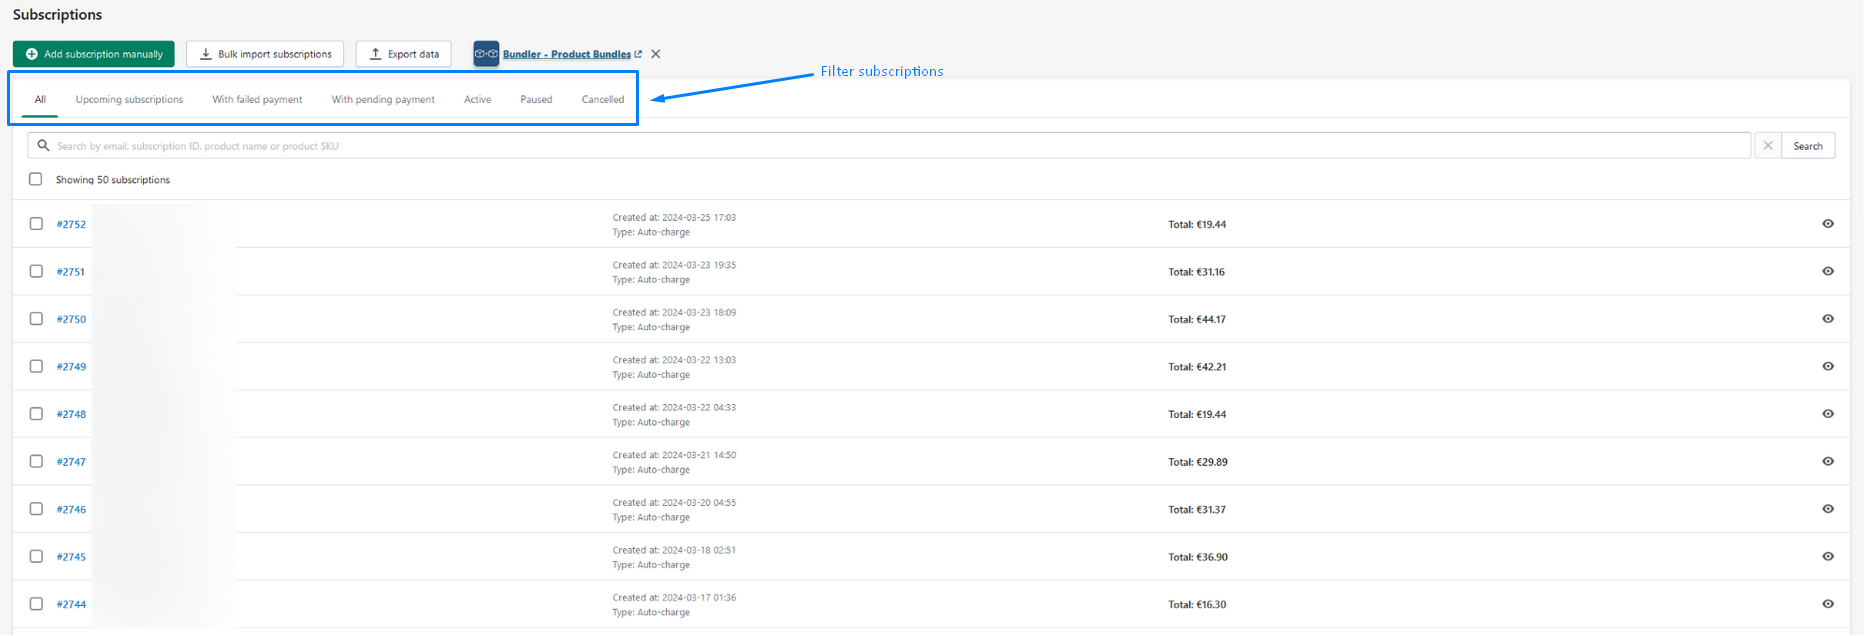
What you see is now the main window for managing your subscriptions. This will be your dashboard where you can:
- Click on one of the subscriptions to see it's details,
- Add a subscription manually,
- Import & Export subscriptions,
- Filter your subscriptions to only see upcoming subscriptions, subscriptions with failed payments, subscriptions with pending payments, and active, paused, and cancelled subscriptions.
In the list of subscriptions, each subscription has a unique ID to identify it, name and surname of the customer who subscribed, contact of the customer, status of the subscription, created at date, type of subscription and the total amount that the customer has paid for this subscription.
When a new subscription is created, it appears on this list of subscriptions where you can see its details and manage it.
On how to import your subscriptions from another app such as Recharge, you can find more about this on this article.
Analytics
An Important thing outside of the subscription list page mentioned above is also to keep analyzing and looking at the different analytics so that you get the main idea of different statistics such as average revenue per customer, maximum revenue per customer, growth rate, and more.
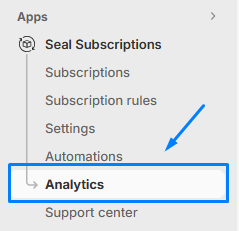
To access analytics simply press the Analytics tab in the navigation menu by going to Seal Subscriptions → Analytics. Here you have different options to view:
- Statistics, which allows you to oversee your churn rate, growth rate, and more,
- Retention rate that allows you to understand your customer's behavior and
- Inventory forecast where you can restock your inventory ahead of schedule.
All of the features mentioned above are very important to the subscription management process since you can plan and increase the value that the subscriptions bring to you.
Managing subscriptions
When you go to the list of subscriptions you can click on a specific subscription to view its details. You will now see a bunch of different blocks for many different options. But don't be scared, we will explain them here and you will realize it's actually a very simple process.
NOTE: Every block on this screen has an edit button in the right upper corner of each window to edit information about the subscription such as changing the delivery and billing interval, changing customer info, billing information, items of the subscriptions, delivery options, and additional info. This gives you a lot of freedom as a merchant so be careful when editing sensitive information about the customer. Managing this can be very important as if a customer requests you to change their certain information about themselves or about the subscription.
Overview
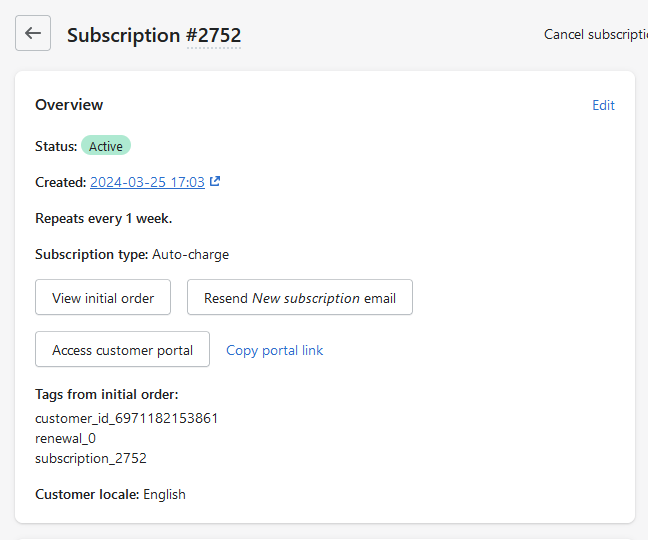
The first block that you can see is the overview block. This block shows the main properties of the subscription such as status, cancellation reason if there is any, created date, delivery and charge intervals, minimum required number of payments, and subscription type. You can then:
- Click on the “View initial order” button to be redirected to the actual order of the product that the subscription was made for,
- click on the “Resend new subscription order” button to send another mail to the customer informing him again about the subscription,
- click on the “Access customer portal” button to see exactly how the customer can see their subscription on the store.
Customer
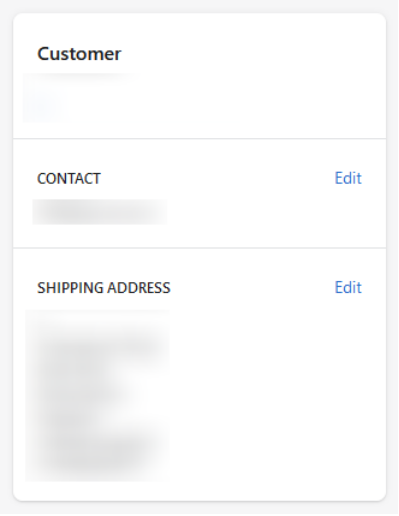
Basic information about the customer is displayed here such as their name, contact, and shipping address
Items
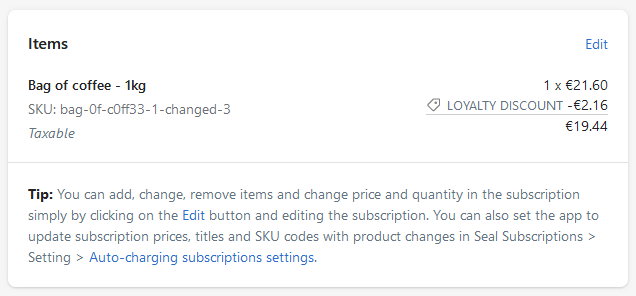
Overview of the items that are connected to the subscription. This window also shows the initial price of each item and price change after a certain payment interval, if there is any. As mentioned, you can edit items in the edit screen by simply clicking the edit button. You can change the quantity of the item, make it a one-time item only (only for one renewal), change the automatic price modification after specific payment intervals, and add line item properties to items.
Billing Schedule and fulfillment schedule
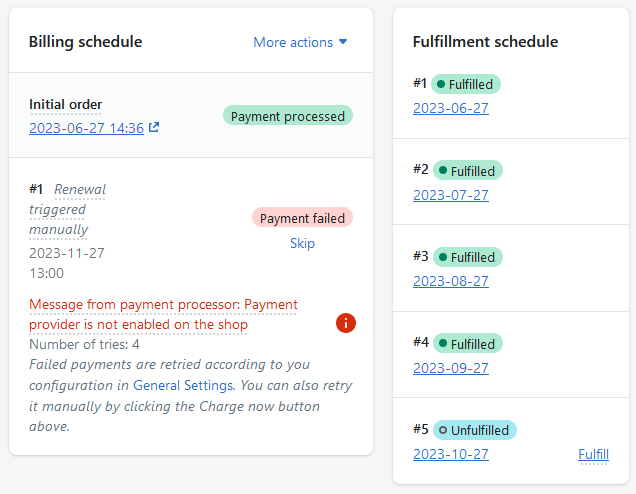
Finally, the last two blocks show you the entire history of all the renewals that the subscription has gone through. In the billing schedule there are two possible statuses:
- Payment processed: payment has been successfully processed for this renewal,
- Payment failed: payment failed due to reasons described near the warning. Reasons can be different for example payment provider is not enabled in your shop etc…
And fulfillment schedule shows you all dates of renewals and if you fulfilled the order yet or not. The options can be:
- Fulfilled: You have successfully fulfilled the order for this renewal date,
- Unfulfilled: You have not yet fulfilled the order for this renewal date,
- Scheduled: Upcoming dates of renewals
You can always press on the “Fulfill” and “Fulfill early” options to mark certain orders as fulfilled.
Good-to-know settings for better subscription management
Now that you have a general understanding of viewing and managing it's also worth mentioning different settings that can be helpful for better subscription management. Below are listed some of the settings that you might find useful.
Price change propagation
You might often change the prices of your products. By default, the price does not automatically change in your subscriptions, so keep that in mind. By going to Seal Subscriptions → Settings → General Settings → Auto-charging subscriptions you can enable the option so that the system will automatically propagate and sync price changes to products in subscriptions. There are also other options regarding price change propagation such as applying subscription discounts on each price change propagation and matching products by their SKU and variant IDs when propagating price changes.
If you don't want the price change to happen automatically, there is also an option to trigger updates on the prices in your subscriptions. This way you can also manually force the system to trigger the updates.

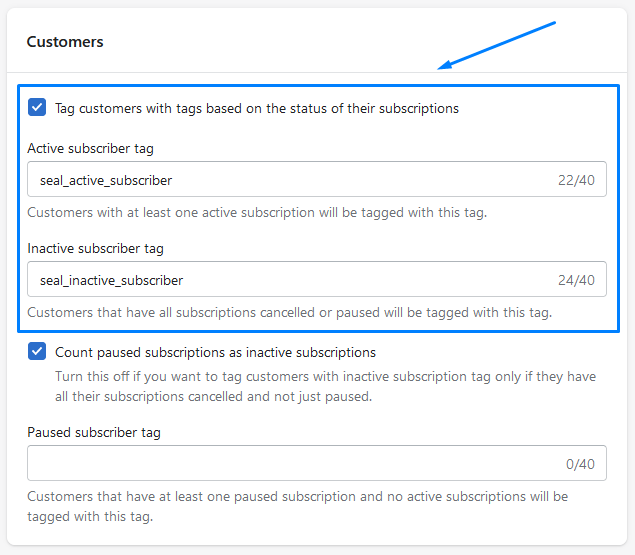
Tags
The Seal Subscriptions app allows you to tag customers based on the status of their subscriptions. This way you can further distinguish between active, inactive, and paused subscribers. You can also use these tags for other apps that may require and work with specific subscribed customers.
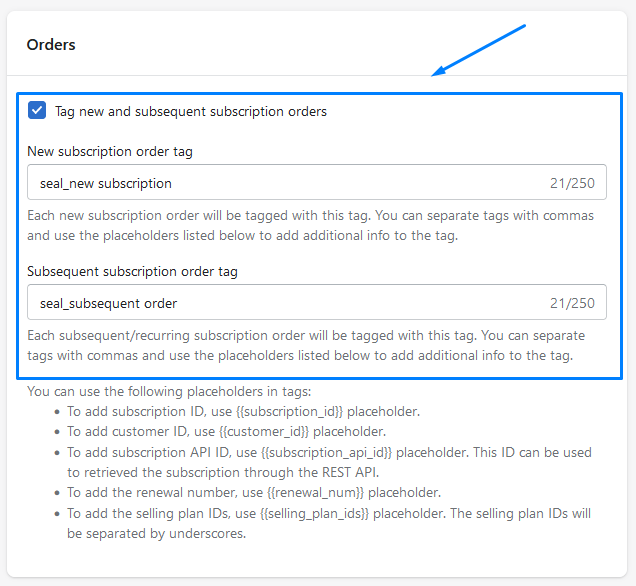
Another way you can use tags is on orders where you can tag new and subsequent subscription orders where you can add even more things such as subscription ID and customer ID.
You can find, enable and setup tags by going to Seal Subscriptions → Settings → General Settings → Customers for customer tags and Seal Subscriptions → Settings → General Settings → Orders for order tags.
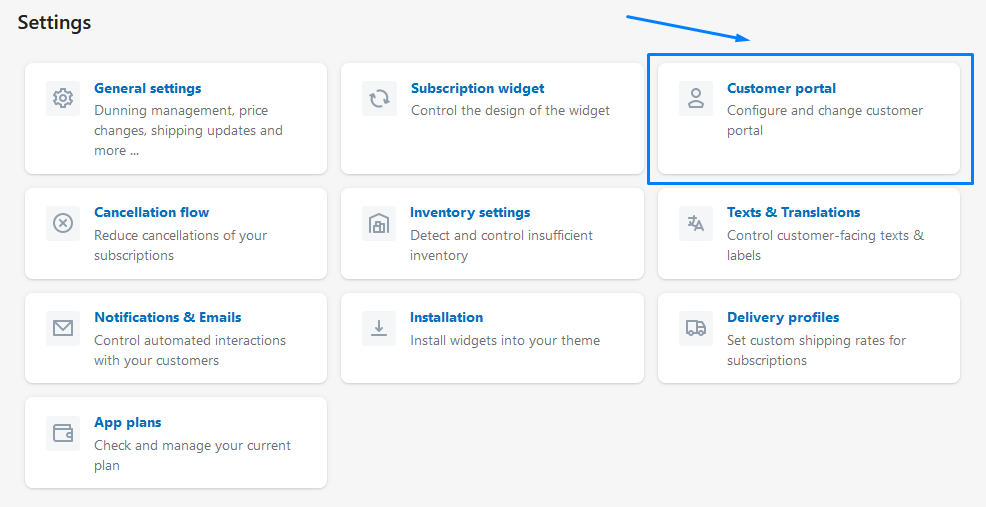
Customer portal
A big aspect of subscription management is the customer portal, which is what customers will see when managing and viewing their subscriptions. Seal Subscriptions offers you a wide variety of options that you can use in the customer portal to allow certain things that customers can do in the customer portal.
You can access customer portal settings by going to Seal Subscriptions → Settings → Customer portal
You can read more about how to set up customer portal in this article
Cancellation flow
When a customer cancels their subscription, it's always good to know the main reason why did they cancel it. In the cancellation flow settings, you can set up many different reasons that customers can pick from. You can also enable the option for the customers so that they can write their cancellation reason. This way, you will have a better overview as to why are your customers cancelling subscriptions which might give you a better idea of how to improve your store, products, and subscriptions.
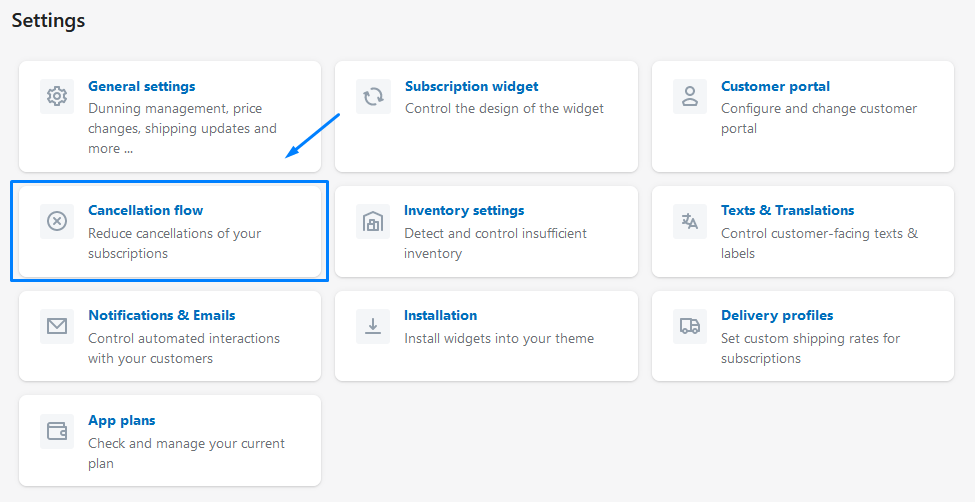
You can find cancellation flow settings by going to Seal Subscriptions → Settings → Cancellation flow
Automations
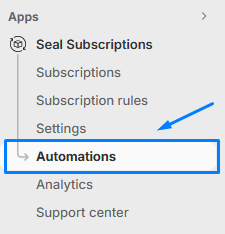
The last thing that is worth mentioning is the ability to automate processes in subscriptions. You can do that by going to Seal Subscriptions → Automations.
Here you have the following options:
- Loyalty discounts: where you can set up the loyalty discounts for your subscribers for auto-charging subscriptions,
- Product swaps: which allow you to automatically swap specific products in subscriptions and
- Automated interval changes: this allows you to set the app to automatically change intervals in your subscriptions.
All of these options are great so feel free to explore them and enhance the experience for your subscribers.
Conclusion
We hope that this article will enhance your subscription management in your store, give you some new intriguing ideas, and overall boost the performance of your store. In case you have any more questions you can always check out our FAQ page here. Understanding the business of subscriptions is very important, so make sure you've set up everything that you need for your store!
Happy subscription management! 🛒